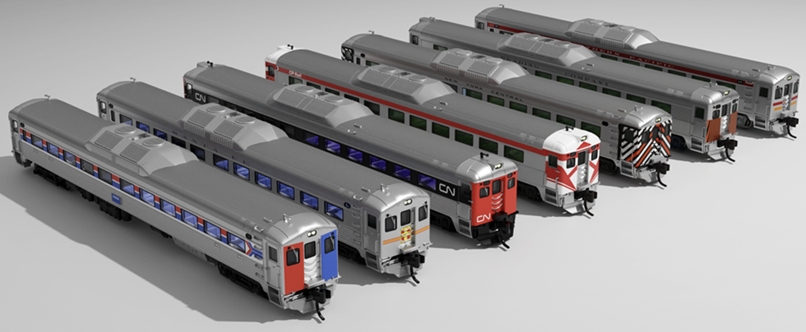
Introduced: 2025
These RDC-1 models are available in either "Phase I" or "Phase II" body styles. Phase II cars have smaller cab/end windows to allow for side numberboards, higher headlights (to clear the diaphragms), and roof fluting that stops short of the end doors. Additionally, they are available either DCC-Ready or equipped with DCC-Sound. As delivered, the cars are not numbered. However, a sheet of numberboard decals is included in the box. Also included is a plastic baggie containing a radio antenna, two gyralites (non-functioning), four diaphragms, two end doors without chains and a traction tired wheelset.
The mechanism has three main parts - a metal base (which provides a surprising amount of heft), a plastic seating section detail that screws to the aforementioned metal chassis, and a motherboard that clips to bulkhead details that are attached to the seating section.
The standard motherboard is equipped with a Next18 DCC socket and a speaker. Additionally, DCC-Sound versions (like mine below) come with an ESU LokSound decoder plugged into the DCC socket. Wires from the trucks transfer current to the motherboard (two wires per truck). Additional wiring transfers current from the motherboard to the motor and the speaker. Each pair of wires has its own plug that connects to the motherboard. All of the LEDs for the interior and exterior lighting are mounted directly to the motherboard. Two large "MoPower" capacitors attached to the motherboard serve to provide uninterrupted current flow to the mechanism.

The drivetrain seats inside of the metal chassis. The motor (a round "can-style" jobber) is presumably coreless and five-pole. Small brass flywheels are attached to the metal motorshafts. Lengthy plastic driveshafts run between the flywheels and the worms inside of the truck towers (driveshaft connections are of the traditional "ball and cup" ilk).
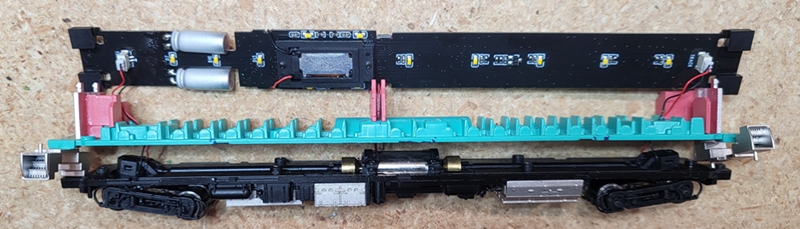
All four axles are geared and all gearing is plastic. All eight wheels provide pickup by way of wired wheelback wipers (yuck). Arms off the tops of the truck towers serve to hold the trucks inside the chassis. The lower portions of the truck assemblies clip to the top, so you'd basically have to disassemble the trucks to get them out. The MTL-esque couplers are mounted to the chassis. Wheels are low-profile (no problems on Code 55 rail) -

The shells and all the associated detail parts are plastic -

These are terrific looking models that run every bit as good as they look. Performance is smooth and whisper quiet at all throttle levels. Slow speed creep is one-tie-at-a-time, although the top-end speed does seem a bit excessive (if such things bother you). Mine didn't have any problems on sharp (9.75" radius) curves. The sound is robust and well rendered. And although I'm not a huge fan of wheelback wipers, it is simply impossible to get one of these babies to stall out. Thanks to those hefty MoPower capacitors, you can remove one of these from the rails entirely and it will continue running for a full 15 seconds before finally shutting down. Overall, these are outstanding models in every way (earning them the distinction of being Rapido Train's best selling N scale model ever).
Note that the owner's manual strongly advises against using your RDC to pull anything (although they don't actually explain why). This seems like a strange advisory to me, especially for a model that comes with an optional traction tire wheelset in the box. FWIW, I used my RDC to pull a coach around for a while (a practice employed by many real world railroads) and it didn't seem to bother it any. The manual also advises against powering your DCC-Sound RDC with any sort of old school "train set" style power pack (MRC 1300/1370, Bachmann Spectrum Magnum, Atlas 313, et al), which actually does make a certain amount of sense to me.
Prototype -
Built by the Budd Company of Philadelphia in the hundreds between the late 1940s and early 1960s, the single-car RDC (Rail Diesel Car) fleet was ubiquitous on passenger service throughout Canada and the United States on any routes that could not justify loco-hauled operation. The 85' long vehicles, which were powered by a pair of Detroit Diesel Series 110 engines, could be employed in single formation or coupled together with other examples - all controlled from the lead RDC cab. In the United States, the Boston & Maine was the principal user of these single-car units, but they were also an important part of the rural lines and short-haul commuter passenger fleet of other railroad companies, including the Santa Fe, B&O, New Haven, NP, NYC, Reading, SP, and many others. Many later went on to Amtrak and various commuter agencies such as the Metro-North among others. RDCs can still be found in small numbers on scenic lines in both countries, as well as some rare regular services. In Canada, CN and CP rostered large numbers of RDCs, which later passed to VIA. The RDC served branchlines from coast to coast, and were a means of reducing the costs of unprofitable local runs. They were also ubiquitous on the mainline, often in multiple units of three, six or even 11 cars! CN's RDCs could be found across the country in early years and mainly in the Toronto area in later years. Eager to cut costs, CP used the RDCs everywhere, especially in commuter service, the Maritimes, and Vancouver Island. In VIA years, the RDC formed the backbone of shorter services in Quebec, the Toronto area and the Maritimes, as well as in Alberta and BC. PGE and later BCR used a fair number of RDCs in British Columbia right up until 2002.
Model Features -
- MoPower capacitor system for uninterrupted DCC power
- Designed from original blueprints and field measurements
- Accurate Phase 1 and Phase 2 body details
- Both fabricated and cast trucks, as appropriate
- Single-motor, all-wheel drive for unparalleled reliability
- All-wheel electrical pickup
- Directional headlights and red marker lights
- Flicker-free interior lighting
- Tinted windows and fully detailed interiors
- DC/Silent (DCC Ready) or DC/DCC/Sound (ESU LokSound)
- Factory-installed couplers mounted at the correct height
Shell Removal -
To remove the shell you must first unscrew and remove the couplers. Once those are out of the way you need to spread the sides of the shell away from the chassis. This will free up the six clips (three per side) that hold the shell to the chassis. Once the clips are freed up, the shell should lift up and off.
Grade: A