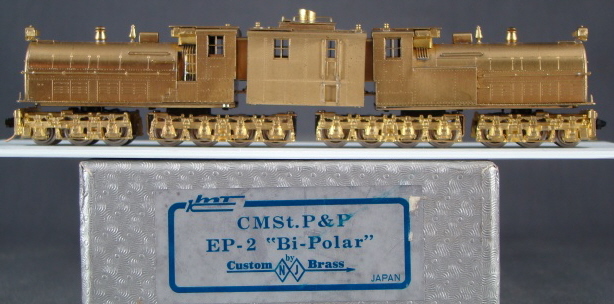
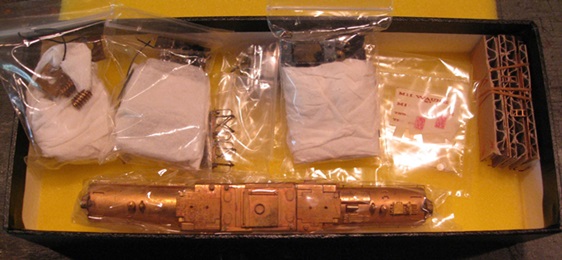
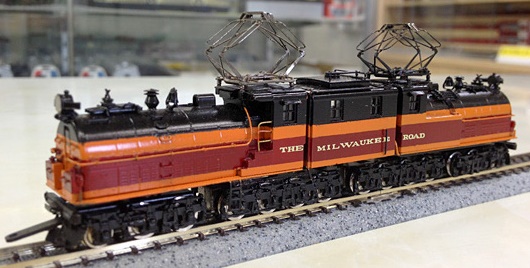
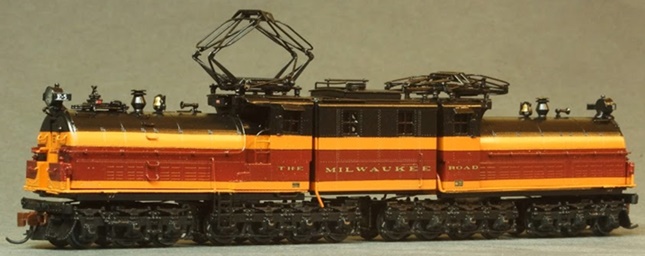
Introduced: 1983 (first run, imported by NJ Custom), 2000 (second run), and 2015 (Ron Bearden Custom)
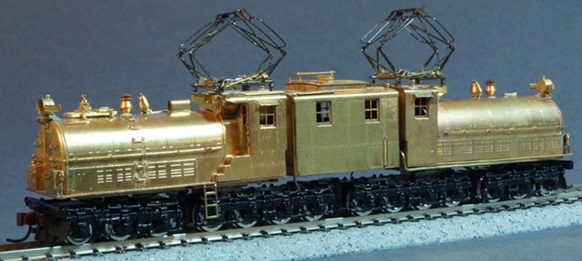
The 1983 EP-2 was NJ Custom's first N scale brass import (and in fact, one of the first N scale brass imports ever). And wow, it's a very odd model of a very strange prototype. The unit actually comes in three separate pieces - two "cab" units (each with its own motor) and a center "boiler room" section that hangs suspended between the motorized units on little pegs -
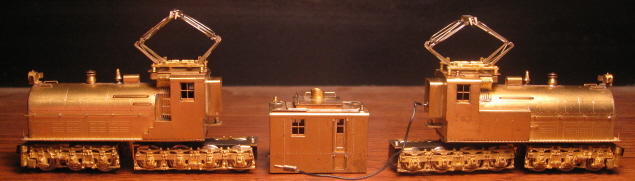
Ala carte pantographs and ladder extensions are provided (to be installed by the modeler). Installing the pantographs is pretty simple - just stick the pegs in the holes. Unfortunately, although they move up and down, they are not sprung (ugh). As for the ladders (one long, two short), the long one slides into a slot underneath the door on the center section, and the two short ones should (based on pictures I've seen) go under the steps on the two cab units (attached to the sidesill). However, how the latter is accomplished is not immediately obvious to me - there aren't any sort of slots or holes that I can see, so maybe you're supposed to solder them?
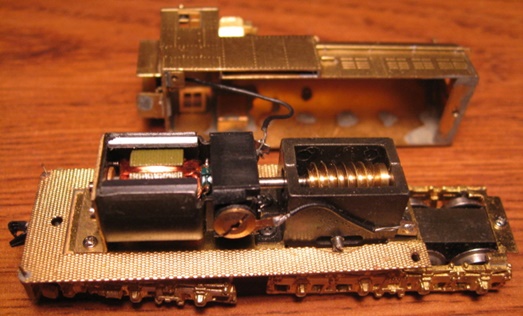
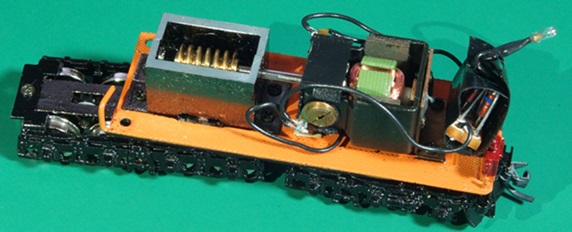
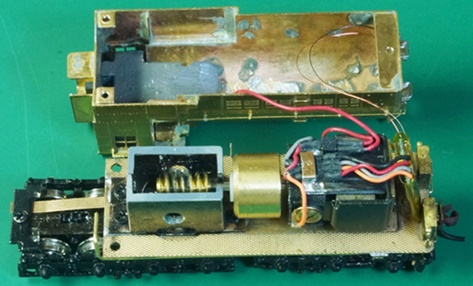
The motorized units have a simple rectangular brass chassis. The motor is an open-sided 5-poler connected to a single (and very large) brass worm. The far end of the driveshaft mounts inside of a bearing (which is loosely fit to the gearbox). Of the seven axles, only two are actually geared (the forward two on the 4-axle truck). All gearing is metal. The geared (4-axle) truck is held to the gearbox by a threaded knock-out pin. A simple screw holds the 3-axle truck to the chassis (underneath the motor). The 4-axle truck picks up right-rail current, while the 3-axle truck picks up left-rail current. There is no lighting or window glazing. There aren't any traction tires or couplers either, although a Micro-Trains coupler will install inside the provided pocket inside the 3-axle truck. Wheel flanges are reasonably sized, so no problems on Code-55 track.
Truck pickup is really primitive (and finicky). Each axle has one "live" wheel and one insulated wheel. Current moves from the "live" wheel into the axle, which then rubs directly on its respective truck assembly. So, in order to keep things running smoothly, you're going to have to occasionally pull the bottom plates off the trucks and give the axles and axle "pockets" a good cleaning. And be careful about how you go about lubricating the truck gears. If you use plain old oil, it's going to foul half your right-rail current-collecting axles. I'd suggest using something like Conductalube instead.
Current from the 4-axle truck flows into the the gearbox (and ultimately to the motor by way of a wire). Current from the 3-axle truck is transferred directly to the motor via a wire. Current is shared between the two motors in a somewhat bizarre scheme - right-rail current flows through the chasses (and ultimately the shells), whereas left-rail current is shared by a series of wires. Each unit has a wire running from one of its motor contacts to a metal socket on the back of its shell. Current is then passed between the two units via a two-plug wire that connects the two sockets (routed through the center section). Truly weird, but I guess it works - at least for a while. Unfortunately, the wiring is reportedly prone to coming desoldered over time. And in a similar vein, all of the various screws that hold things together are also prone to working themselves loose. Making matters worse, some of the screws are not particularly easy to access and re-tighten, and attempts to resolder any unstuck wires may actually damage the model.
Overall performance is pretty mediocre. OK, if everything is nice and clean (vis'a'vis the wheels, axles and axle pockets), throttle response is pretty good (albeit a bit jittery at slow speeds). However, the top-end speed is completely off the charts. And man, these things are noisy (wobbly bearings and all-brass gearing housed inside of big, hollow brass shells not being a design particularly conducive to quiet running). Further complicating matters is the dual-motor setup. Unless the two motors are matched very well (which is very rarely the case), they are going to work against each other (resulting in more noise and overall rough running).
Due to the lack of any sort of extra weight (not to mention the fact that only four axles are geared), pulling power is fairly anemic. And lastly, I'm just not sold on the overall design. That center section is ludicrously unstable, and the overall affect is that of an old jalopy wobbling and clanking down a bumpy road. So, basically a nice candidate for the display case, but that's about it.
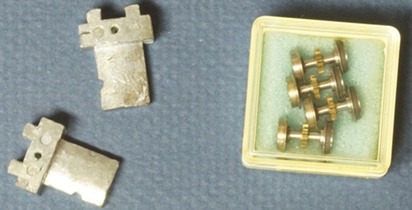
Trivia - in an attempt to address the pulling power issues (and mollify their upset customers), NJC eventually cooked up an ala carte "traction kit" for their EP-2. Said kit included two formed weights that fit inside of the cabs (situated over the power trucks) and replacement wheelsets that included traction tires -
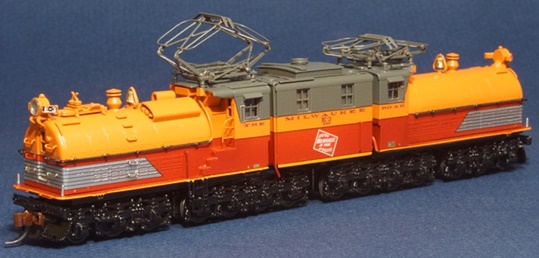
Circa 2000, Kumata manufactured a second run of N scale EP-2's (thirty-five painted/ready-to-run and fifteen kits). Of the original fifty units, thirty-four of the RTR units and five of the kits were sold in Japan. According to Kumata, their original plan was to also sell at least some of these outside of Japan. However, due to the strong exchange rate of the Yen at the time, this never happened.
These new models were based on drawings for HO versions that Kumata had made for NJI and came in three different variants. Whereas the original (1983) EP-2 represents the "as built" version, this second run had early, mid and late "operational" versions (with the differences between the three versions boiling down to the paint scheme and the presence or absence of various bits of shell detailing).
In addition to the extra shell detailing, the 2003 version differed from the 1983 version in a number of other ways - the "traction kit" cab weights were included right from the get-go, the headlights actually work, the windows have glazing, there is no wire running between the cabs, the motors are different (smaller), all four axles on the powered trucks are geared, and the gearboxes have no bearings (owing to the shorter driveshafts) -
Surprisingly enough, these second-run models actually run quite a bit worse than the original 1983 production. For starters, the kits are pretty much useless "as is" (IE, once assembled they won't run at all without some serious modification). And although the RTR models were apparently tweaked a bit during assembly, they still don't really run worth a damn (as one might expect, taking away the shared current conductivity between the two motors and removing the stabilizing driveshaft bearings turned out to be a couple of very bad ideas).
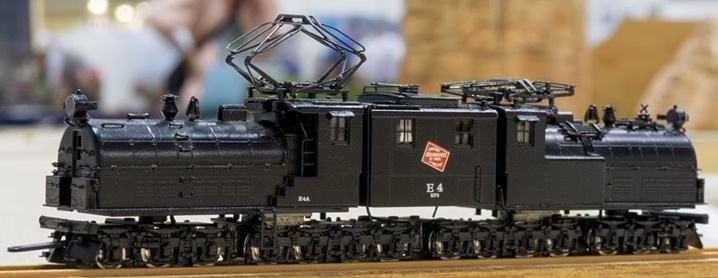
In 2013, Ron Bearden (noted N scale locomotive guru) learned that Kumata still had some of these second run models sitting around gathering dust and wound up purchasing the remaining ten kits (along with the last RTR model) -
Not satisfied with the deficiencies inherent in the basic Kumata model, Ron essentially performed a top-to-bottom redesign. He started by testing all of the motors in order to find pairs that matched up well and then added flywheels to them. Next, he designed a mechanism for adjusting the pitch of the motors. In addition to allowing him to get the worm-to-truck contact just right, this also served to hold the motors more firmly in place. He also vastly improved electrical pickup by adding custom wipers, additional weight, and a better jumper wire through the boiler room. All of the wiring is modular (employing micro-plugs and sockets in order to simplify disassembly and reassembly). One pantograph is now sprung (as per the prototype) and the lighting has been changed to modern (bright white) LEDs. The locomotive employs two Digitrax "Z" decoders (one per cab), thus allowing precise speed-matching between the two motors.
Structurally, he improved the stability of the center boiler section by adding extra weight to it. He also straightened out the misaligned boiler-to-cab connectors and reinforced them with solder. Additional detailing (beyond that provided by Kumata) includes grabirons, underframes, horns, bells, wind deflectors, jacking pads, railings, blackened wheels, Micro-Trains couplers, custom paint, and custom decals. One of the models has a thin skirting added to the boiler room (based on a particular prototype) -

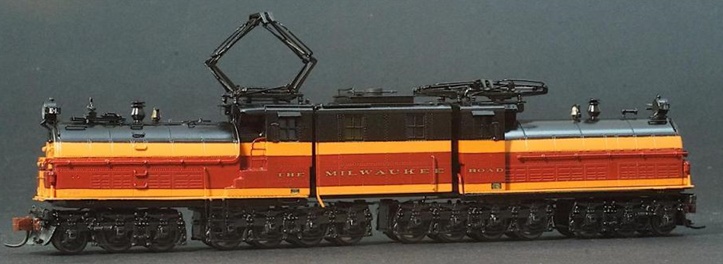
These customized locomotives are terrific runners (light years beyond the original Kumata models). Pickup is flawless and throttle response is smooth at all levels. The one I tested can creep along one-tie-at-a-time at the low end of throttle (even through insulated-frog turnouts) and has a very reasonable top-end speed. Pulling power is exceptional, with mine comfortably able to haul 30+ assorted 40' freight cars through curves on level track. 11" seems to be about the minimum radius for curves (mine stalls out on curves any sharper than that). The two cab units speed-match pretty well, although if I were interested in operating one of these on my layout I'd go ahead and tweak the decoder settings to get them a little closer. The only minor issue I encountered with mine is that it got a little loud (grindy/growly) at the high end of the throttle. Not really a big issue for me since one wouldn't ever be running it that fast anyway (and who knows? Maybe things will quiet down with a bit of lubrication and break-in time).
As of this 2015 writing, Ron is building and selling these one at a time (in various prototypical paint schemes and detailing packages). For more information, you can contact Ron at drronbearden@hotmail.com
To remove the shell from a motorized unit (first or second run), unscrew the three small screws (one at the front-center, two at the back-sides). The shell should lift up and off at that point (be careful not to yoink the wire running from the motor to the shell on the first-run units).
For the Bearden Custom version, the screws are located in the same places. However, the two under the cab are hidden. To access these, you first need to use a small screwdriver to slide the screw covers out.
Grades: C (for the NJ Custom models), D (for the second run models) and A (for Ron Bearden's models)