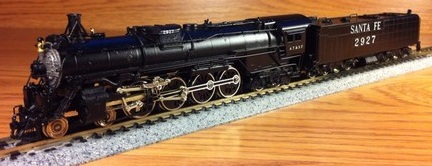
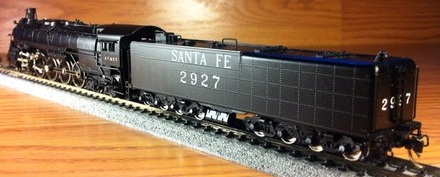
Introduced: 1991
I don't know what the whole "Yulim" story is, but whatever the case, they had a relatively brief career as far as N scale brass locomotives are concerened (limited to this ATSF Northern and a trio of USRA/SP Mikados released in 1990). Both of Yulim's steam mechanisms share the same simplistic design -
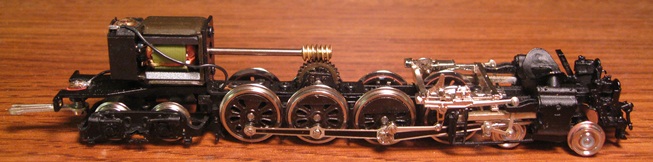
The locomotive chassis is all metal and fairly minimalistic (with most of the actual heft being provided by the shell). The motor is an open-sided / straight-wound 5-poler. Right-rail pickup is provided by three of the four right-side drivers (the third pair of drivers from the front being equipped with traction tires). Left-rail pickup comes from the eight left-side tender wheels. Current is transferred from the tender to the motor via a stiff wire on the drawbar (said wire being "U" shaped, and thus contacting the tender post at two different points). Only the center pair of axles are geared (the outer drivers being turned solely by the valve gear). The worm and worm idler gear are brass, whereas all the rest of the gearing is plastic. There is no lighting. A dummy (non-operational) coupler is mounted to the pilot. There is no coupler on the tender, although a Micro-Trains friendly pocket is provided. Wheels are low profile, so no problems on Code-55 rails. A goody bag of spare parts (screws, etc) is included in the box. Oddly enough, this model does not come with a replacement (non-traction tire) driverset.
As delivered, performance on these models is extremely poor. For whatever reason, current conductivity to the motor is very uneven, and with the end result being a lot of stalling and overall jittery behavior. I suspect that the tender drawbar is the weak link, but despite spending several hours trying to pin down the problem, I never did figure it out. Oddly enough, mine doesn't run too bad at slow speeds. Rather, it's the upper half of the throttle where most of the problems surface. Odder still, it seems to run best in reverse (don't ask me why). In addition to the electrical problems, these things are quite noisy. Also, the pilot truck is extremely prone to derailing (even on relatively broad curves).
I'm told that seasoned locomotive tuners can get these models to run acceptably well (see below). As for the rest of us? Well, if nothing else they're awfully good at looking pretty in a display case (and which may explain why this was the last Yulim steamer imported by Key).
To remove the locomotive shell, first unscrew the two black screws on the back of the cab. Next, unscrew the silver screw underneath the pilot truck. Once the screws are out, the shell should lift off readily.
Grade: D
OK, allow me to now turn the podium over to Max Magliaro (who will explain just how one goes about coaxing better performance
out of these things) -
Chances are that your first job will be to regauge all of the wheels (since they were all way too narrow on mine). This means that you have to take the tender
trucks apart (however, they do come apart with screws, so it's not that bad). For this, you will need some kind of wheel puller (NWSL's "The Puller" did the job
for me). Doing the pilot and trailing truck wheels is also relatively easy (once again, coming apart with screws).
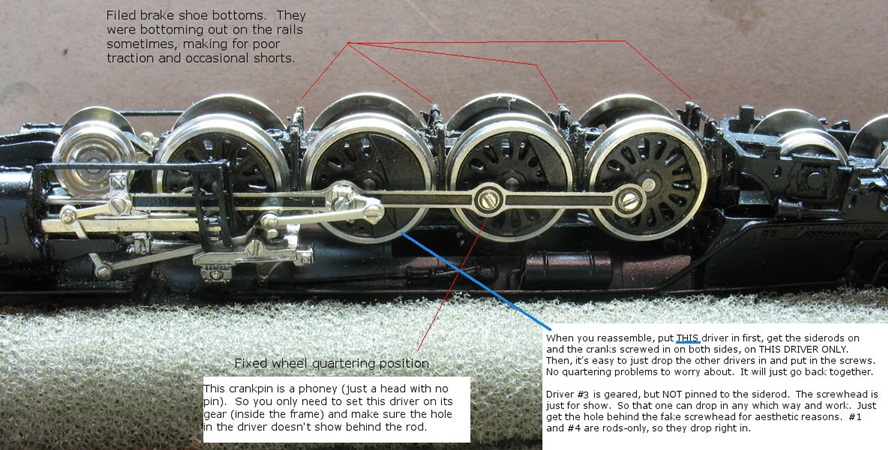
As for the drivers, well, that's another story. The good news is that the cranks aren't soldered on (as they are with many brass steam engines).
Rather, all of the side rods and the main cranks come off with screws.
So, first unscrew all the rods, unscrew the bottom cover plate, and then drop out all the drivers. Next, use "the puller" to adjust the gauge to match the NMRA
plate and then put them all back in. It's not as bad as it seems since only one driver is both geared and pinned to the
siderods (driver #2, the one with the crank on it). So you put that one in and then get the siderods on and the cranks back in.
Now you can just drop the other drivers in and put all the siderod screws back in. Since they are all simply rod-driven,
there is no horrible quartering to adjust and no worries about getting the rods aligned with the gears.
While you're at it, also file the bottoms of the brake shoes so that they don't scrape or short out on the rails.
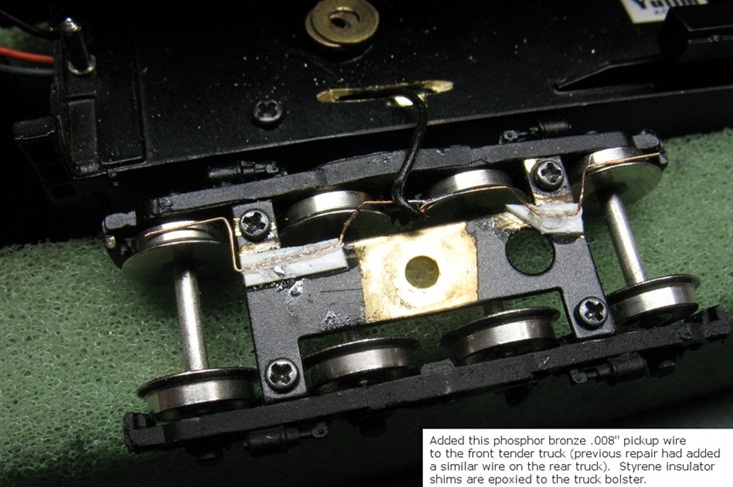
Your next (tedious) task is to add right-rail pickup to the tender trucks -
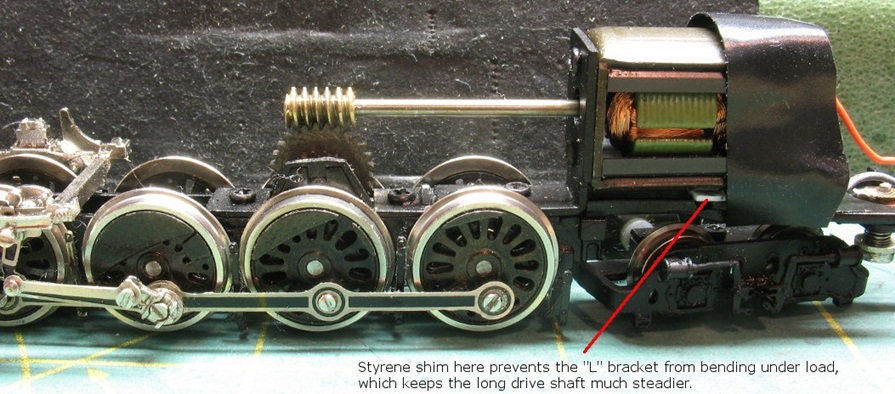
Next, shim the motor bracket. The motor is mounted on a metal L-shaped bracket. However, said bracket is so thin that the motor can bend back and forth
very easily (which makes the worm bob up and down like crazy at the end of that long driveshaft). A simple shim under the motor stabilizes the whole thing
quite well. You will need to experiment with the shim thickness and exact positioning to get the best running.
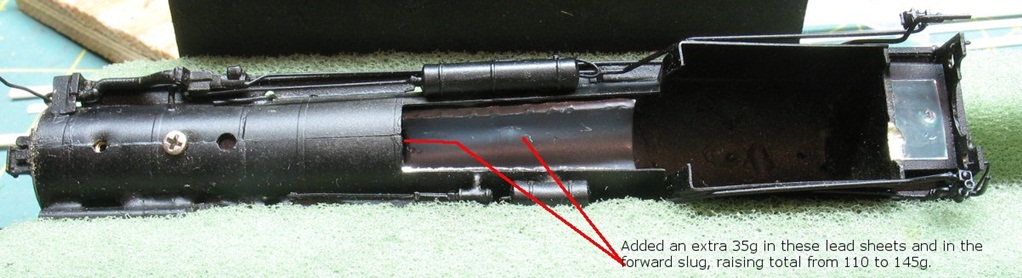
Next, add lots of weight to the boiler (there's plenty of room for it). This is important as it prevents the engine from nosing up in the air (and
thus leading to derailments).
Lastly, grind some clearance above the pilot truck (the stupid thing touches the underside of the frame, which causes derailments and shorts).