Introduced: 1996 (first version), 2001 (revised version), 2007 (20th Anniversary version) and 2008 (KOBO-Custom DCC version)
Whether you're talking detailing or performance, Kato's nigh legendary 2-8-2 is, without a doubt, the first superstar steam model ever made in N-scale. Steamers may come and go, but Kato's Mikado remains the gold standard by which they'll all be measured. Better still, Kato has continued to improve them with each new production run.

OK, ignore the DCC decoder in the above picture - obviously not a stock feature.
Anyway, the chassis is all-metal and split-frame. The motor is a closed-sided, straight-wound 5-poler (with a small flywheel attached to the back side). All the drivers provide pickup (no traction tires), as do all the tender wheels (the pilot and trailing trucks being electrically neutral) All gearing is plastic. An LED-equipped PC board mounted to the front of the chassis provides directional lighting. There is no back-up light in the tender. The wheel flanges are (for the most part) low-profile (more on that shortly). All but the forward pair of drivers are geared.
The couplers on this model have varied over the years. The initial 1996 release came with a fixed (dummy) knuckle coupler on the pilot and a truck-mounted Rapido coupler on the tender. The 2001 release came with Kato's "semi-automatic" knuckle on the tender. And although the locomotive still came with a fixed knuckle, the pilot was modified to allow said coupler to be swapped out in favor of a Rapido (included in the box). The 20th Anniversary release sports semi-autos on either end.
Particularly impressive here is the current collection scheme employed in the tender. Very much similar to Kato's 1985 4-8-4 S-2 model (as imported by Con-Cor), the tender wheels pick up rail current and transfer it into the tender chassis using the same sort of all-wheel / low-friction design that actual locomotive trucks might (IE, no axle wipers, nor any of that other old-school insanity). The drawbar (by which current is transferred to the locomotive chassis) is similarly bullet-proof. You simply can't beat the solid combination of a plastic drawbar with fixed / stiff wires running through it.
In fact, the tender pickup on the initial release was so impressive that I guess nobody down Kato way ever even noticed that the drivers weren't really pulling their weight (electrically speaking). However, if you take one of the old 1996 Mikes and try to run it without its tender, chances are it, well... won't. As it turns out, there simply isn't enough metal on the back sides of those drivers to provide reliable conductivity (vis'a'vis the wipers). Fortunately, Kato (as is their wont) quickly addressed this problem. And starting with the second (2001) run, the drivers were modified to provide better conductivity (more metal was provided on the back side).
Regardless of the release, performance on these models is, in a word, breathtaking. These babies run absolutely smoothly and quietly. Throttle response is flawless, pickup is perfect, and slow-speed creep is beyond amazing. OK, yeah, the top-end speed is excessive. But hell man, turn the damned throttle down if that bothers ya. No problems navigating narrow radius curves and no problems with any of the various wheels derailing.
So OK, it's wonderful and all. However, there are a couple of issues. First off, up until the 20th Anniversary edition, these models were a bit of a do-it-yourself project. Basically, one was presented with a bag full of tiny little detail parts that had to be self-installed. And brother, the things were beyond small. Frankly, the whole exercise was something akin to plucking the eyebrows from a gnat. Fortunately, Kato came to their senses and, starting with that 2007 release, these models were finally available with all the detail parts pre-installed.
Another concern here is the overall complexity of the model. Quite frankly, the shell is a total Chinese puzzle box of interlocking parts - the removal of which is a hugely complicated procedure. And sorry, no, I'm not going to try to take mine apart in order to document the procedure here. Still, if you're keen on wrecking your Mike, try googling "kato mikado shell removal" (or somesuch). I'm sure somebody somewhere has documented the steps.
The other piece of moderately bad news is that, out of the box, these locomotives don't pull worth a darn - no more than 7-8 cars on straight and level track (and perhaps half that on a minimal grade). Fortunatly, Kato owned up to this particular shortcoming very early on and released a traction-tire equipped replacement for the rear driver set. Better still, it's a simple drop-in installation that anyone can perform in about ten seconds (and costs less than $10).
Starting with the 2001 run, these models came with graphite smokeboxes and fireboxes -

In addition to the previously mentioned second-run mechanical changes (drivers, couplers, etc), the drawbar was also modified (strengthened) in this release. I'm told that the plastic drawbar on the 1996 version was prone to getting bent out of shape or out-and-out snapping (particularly during shipping). Once bent, it would tend to lift the tender wheels off the rails (thus interfering with pickup). The wheel flanges on the pilot and trailing trucks were also modified with this release (downsized to allow for operations on Code-55 rails). I've also been told that the headlight LED was somehow modified (improved) in this release, but so far nobody's been able to pin down for me what those improvements were exactly. Some have speculated that the LED was made a little brighter, while others have opined that the revised LED is less prone to flickering.
Here's the 20th Anniversary release (2007) version with its aforementioned factory-installed shell detailing and pilot/tender automatic knuckle couplers -
And if you're scratching your head over the whole "20th Anniversary" thing, here's the deal - it's not the 20th Anniversary of this model. Rather, it's the 20th Anniversary of "Kato USA".
In 2008, Kato released a DCC version of this model under their "Kobo-Custom" label. It features animated firebox lighting and an honest-to-gosh DCC-controlled coupler on the tender -

This model actually has two different decoders - one inside the engine (for motor, headlight and firebox light control), and a second one inside the tender for controling the rear coupler. And as much as I'd like to show you the decoder installation inside the engine, there's just no way I'm going to risk wrecking mine by trying to take it apart. Ah, but the tender, now that's easy -
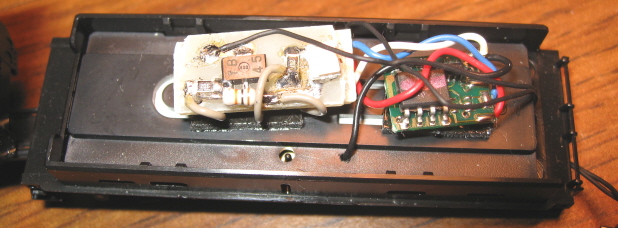
The decoder controls a secondary PC board that, in turn, feeds current into a little memory-wire spring rig on the truck -
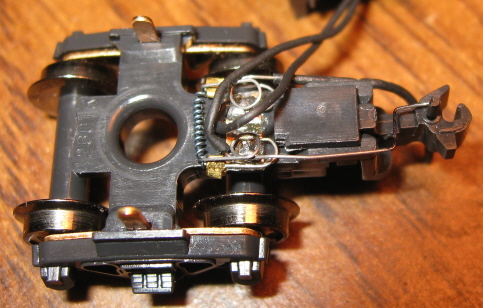
Mechanically, the coupler mechanism is fairly simple. One end of the spring is connected to a long metal pin (very much resembling a typical magnetic trip pin). In its "closed" state, the pin hangs down approximately where an actual trip pin would hang. The other end of the spring is connected to a tiny metal wire, bent to contact the top of the actual coupler trip pin (where it protrudes through the top of the coupler). Said trip pin is clipped off on the bottom (IE, it does not stick out the bottom of the coupler).
The coupler is controlled by F3. When F3 is selected, a number of things happen; First, a red LED on the secondary PC board lights up (with the light routed through a bit of fiber-optic tubing to a custom "back-up light" assembly built into the back of the tender). Next, current is conducted into the memory-wire spring, heating it up and causing it to slowly contract. As the spring contracts, the skinny wire pulls on the top of the coupler trip pin, causing the coupler to swing out. Similarly, the larger pin swings out, making contact with the trip pin on whatever it is you're trying to uncouple, causing the uncouplee's coupler to swing out in the opposite direction of the tender's coupler. And voila, uncoupling ensues. After about 10 seconds, the red light goes off - indicating that current is no longer being conducted into the spring. As the spring cools, it slowly returns to its normal uncompressed state.


It's actually a very effective system, and seems (at least in my initial testing) to be quite reliable. On the downside, I'm not sure how practical it might ultimately turn out to be (vis'a'vis migrating the concept to mass-manufactured models). It all seems a bit fragile, and I suspect Kato would be inundated with returns if things weren't robustified a bit.
The firebox lighting is a nifty little feature. It's very bright and, due to the flickering, pretty realistic looking. It can be turned on and off with F1.
This model is a special limited edition, built to order by a contractor in Japan (IE, not mass produced). As of this writing (2009), the price is $450 (ouch). But wow, DCC couplers? Now that could be the start of something very big! Unfortunately, a Kato representative informed me that they have no plans to migrate the DCC couplers to mass-produced models (not anytime soon, anyway). Nevertheless, if it can be done, I'm assuming it will be done (eventually). One note - this model does not come with traction-tires (although at $450 you'd think it would).
Grade: A (with the traction tire modification, otherwise I guess "B"), and A+ for the DCC version
Reviewed: 4/96 Model Railroader ("For the past several years N scalers have been eagerly awaiting Kato's first American-prototype steam locomotive built under its own brand name. Finally the engine's here, and it's the the most finely detailed N scale steamer we've seen... Our Kato Mike checked out closely with drawings... Particularly impressive was the fine detail, evidenced in such parts as the pilot, air compressor and piping, and firebox rivet detail. Made in Japan, this 2-8-2 comes ready to run in the sense that you can put it on the track and it'll go. It doesn't come ready to look at closely, though. The handrails, bell, whistle, pop-off valves, and tender ladder come as separate details to be added. I found this a difficult and tedious task that took me over two hours, so be prepared. One problem is that Kato provides minimal instructions, just tiny drawings showing where the parts go... When it comes to disassembling this model, my advice is don't, and with reasonable luck you'll never need to. The body is made in four major interlocking pieces and is difficult to take apart...
"The double-shafted enclosed motor is equipped with a small flywheel at the back end and a brass worm at the front. The rear three axles are driven through a set of plastic idler gears. The frame is divided vertically into electrically isolated halves. The locomotive is designed to pick up on all drivers and tender wheels... Checking the model against an NMRA standards gauge, I discovered that the gauge on three driver sets was slightly tight. Also the flanges are about .015" deeper than the standard calls for... The engine ran fairly well, although some subjectivity always enters in. I thought the engine had a tiny hitch in its get-along... After we ran it continuously for an hour, the performance was smoother. On a scale of 1 to 10, where I'd rate the old Con-Cor Kato-made NYC J-3 Hudson a 10, this engine would be a 9. It should pull about 17 freight cars... Of the initial road names offered, only the CB&Q and NYC actually had USRA heavy Mikados. The second release will include GN, PRR and UP, as well as undec. In this group the GN had the real thing. Even if all the models aren't prototypical, I'm sure modelers will welcome the chance to run engines in these road names. The new Kato Mikado looks terrific and its performance is good. It's a welcome addition to the N scale fleet and we hope to see more steam from Kato. AT&SF, CN, CB&Q, NYC, SP. Price: $159.98")
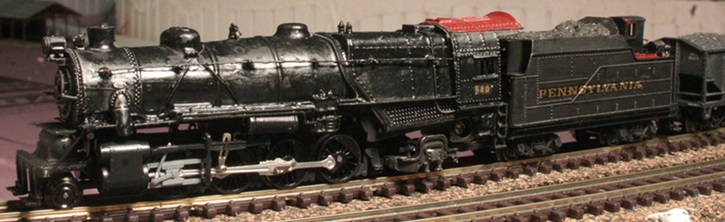
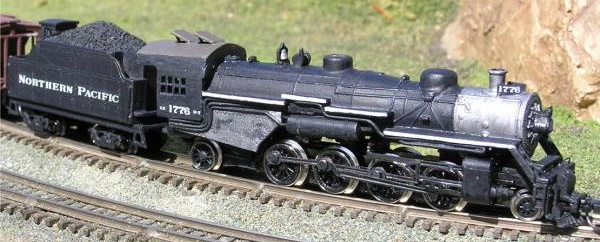
GHQ sells conversion kits designed to transform Kato's USRA Mikado into a PRR L1 or a Northern Pacific W-3. I'm told that the heavy pewter shells go a long way towards improving the pulling power of this otherwise fine model. Here's Alex Gillam's L1 and Robert Ray's W-3 -