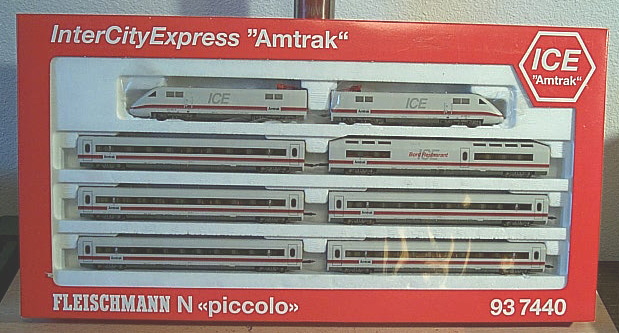

Introduced: 1994
Fleischmann ICE trains have been around forever (in DB livery), but they make it into the encyclopedia here by virtue of this 1994 Amtrak special edition set. These are basically the same as the DB versions, excepting that the DB logo has been replaced by an Amtrak logo. This was a one-time offering by Fleischmann, apparently commemorating the demonstration runs the ICE train made in the United States back in 1992. I've been told that about 2000 of these 8-unit Amtrak sets were made (and perhaps as few as 40 of them were ever sold in the US). I've heard various reports on the retail price- either $800, $850 of $995, take your pick. A good used set might run you as much as $400 (provided you can even find one).
The set contains six carriages and two locomotives (one powered and one dummy). All carriages have full interior detail. Both locomotives have working pantographs, although they can draw current from the rails as well (there being a switch on the bottom of each motive unit that allows one to change it from track-power draw to overhead-power draw). The pantographs are both sprung and moveable.
The chassis is all-metal, although not split-frame (it does not conduct current). Rather, current is routed around via a series of PC boards and metal tabs. The motor is an open-sided 3-poler. All wheels are geared, although only six of the eight provide pickup (with each truck having one traction-tire equipped wheel). Both locomotives (IE, the dummy too) have directional lighting, which changes from white to red when switching from forward to reverse. Unfortunately, the wheel flanges are a bit oversized (IE, forget about running this train on Code-55 rails).
Relative to the era in which it was produced (and even by more modern standards), the powered unit is a superb performer. Pick-up is perfect and throttle response is smooth. The motor is very quiet, and slow speed creep is very good to excellent. Given its overall heft (not to mention the traction tires), the powered unit will ably pull this train around without difficulty.
Where I ran into problems was with the couplers. The specialized couplers between units provide for some serious close-coupling, but they are major pain in the ass to get connected up. And unfortunately, so close is the coupling that this train is pretty much useless on layouts with any kind of narrow radius curves. Mine completely derails when faced with 11" or narrower curves.
The standard DB ICE locomotives are available from Fleischmann with factory-installed decoders (with the decoder on the dummy locomotives simply serving to provide lighting control). The Fleischmann part number for the DB DCC set is 67440. I picked up said set (pictured below) and swapped out the DB shells in favor of my Amtrak shells. So now my Amtrak ICE train is fully digital (not a cheap proposition either, as the DCC locomotive set cost me over $400 - and that was before the value of the dollar dropped off the table).
The units in this Amtrak set are best categorized as "DCC Friendly". IE, they are designed to accept a decoder, just not a plug-in / drop-in decoder. As evidenced by the pictures below, decoder installation is going to involve soldering various wires hither and yon -
Lighting kits are available for the passenger cars (part #9447). However, the carriages in this set are not so equipped. Now, I prefer lit passenger cars. So, I actually picked up one of these lighting kits just to see what they're all about. And, wow, what a complicated morasse of flimsy little parts. Yeah, I gave it the old college try. But, after about 30 minutes of dicking around with the wheel wipers, I eventually decided it just wasn't worth the effort. If these things came with a capacitor (for guaranteed non-flickering lighting), I might've pressed on. Unfortunately, the lighting basically boils down to a simple incandescent bulb. So, I decided to save myself the time and expense and just punted on the whole deal.
To remove the shell from the powered unit, first remove the little cover on the underside of the nose. Next, remove the rear coupler and the little gray plastic piece at the back of the chassis. Then, simply spread the sides of the shell apart at the fuel tank. The shell should lift up and off at that point. Be careful to note the positioning of the little piece of plastic that conducts light into the nose - chances are it's going to fall out during this procedure.
Grade: A (if you have broad curves, otherwise "F")