Introduced: 2013
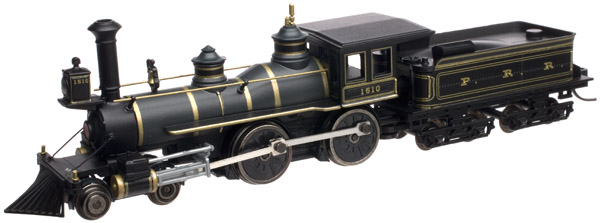
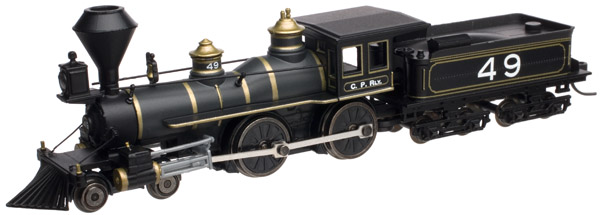
Atlas's 4-4-0 is a gorgeous looking model with fine paint and detailing. It's also a sweet runner (or at least it can be, but more on that in a moment). As pictured above, these models are available with either a flared smokestack or a straight one (the undecorated and painted/unlettered versions come with both).
Like Bachmann's 4-4-0, the motor resides in the tender (with a driveshaft then running forward to the engine) -
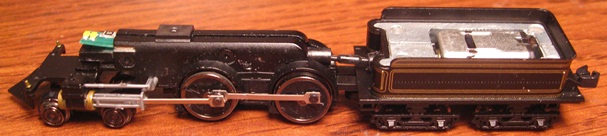
The tender and engine shells are metal (with press-fit / glued plastic detailing). The engine chassis is all-metal and split-frame. Pickup is provided by the rear driverset as well as all eight tender wheels (via low friction axle-cups). The forward drivers and the pilot truck are electrically neutral (the former being equipped with traction tires). Current is transferred from the engine to the tender by way of a pair of stiff wires inside the plastic drawbar. The tender trucks are fixed to the tender chassis (IE, they don't pivot). The motor is a closed-sided can (and as such, I have no idea what its internal specs might be vis'a'vis poles and winding).
There isn't any specific provision for DCC in these models (and virtually no room inside the tender for a decoder). However, the cab is open so a decoder could conceivably be installed there (with wires then running back to the tender). Beyond that, I guess one could stick a decoder up on top of the tender and then cover it with a coal or wood load?
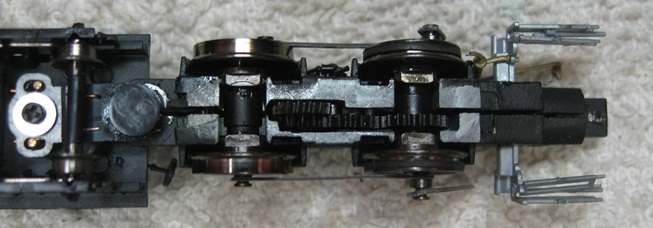
Only the forward driverset is geared (with the rear drivers being turned solely by the cranks). All gearing is plastic. All the drivers have bearing blocks that seat in cutouts in the chassis. An LED board on the front of the chassis provides non-directional lighting. Wheels are blackened and low-profile (no problems on code-55 track). The tender coupler is a chassis-mounted Accumate. There is no provision for a coupler on the pilot.
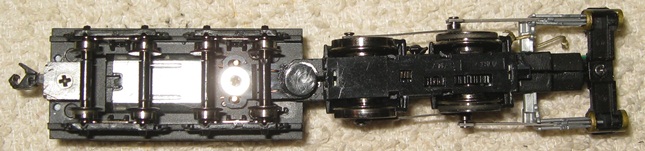
The main cranks are metal, whereas the crossheads and crosshead guides are plastic (press-fit to the chassis on one side and to the cylinder crossbar on the other). The driver bottom-plate is also plastic and press/snap-fit to the chassis. The pilot truck arm connects to a hook on one end of the driver bottom plate (and if said plastic hook isn't bent "just so", the pilot truck has a tendancy to come loose and fall off when handling the model). The pilot assembly screws to the cylinder crossbar using the same screw that holds the cylinder crossbar to the chassis.
If put together correctly, performance on these can be quite excellent. The good ones run smoothly and quietly at all throttle levels. Slow speed creep is outstanding and the top-end speed is quite realistic. Mine has no problems hauling eight Athearn Overland passenger cars on level track, so pulling power is strong. No problems with the wheels derailing (even on curves as sharp as 9.75"-radius) and no problems creeping through insulated-frog turnouts.
On the down side, there have been a number of reports of various QC problems with the first run of these models (myself included). I purchased two painted/unlettered units, and although the first one ran flawlessly, the same cannot be said for the second one. First off, the plastic pilot assembly was bent all out of shape and, as a consequence, virtually touching the rails (causing the locomotive to come to a screeching halt when encountering rail joints). I was able to fix this by simply bending the pilot back to where it was supposed to be in the first place. Secondly, the screws that hold the chassis halves together were too tight (causing the mechanism to bind slightly). I fixed this by loosening up the screws a turn or so.
More vexingly, the cylinder crossbar and plastic crosshead guides were bent in all sorts of funny ways (and not "ha ha" funny either), resulting in very herky-jerky performance (particularly at slow speeds). The locomotive also had a noticeable vertical (up and down) "buck" that may have been related to the crossbar/crosshead woes (or possibly due to the quartering being slightly off, I'm not sure). I did spend a good long time tweaking and tuning the engine (including adding lubrication and running it around in circles for hours and hours) and was able to improve performance fairly significantly. However, despite my best efforts, I never was able to get it to run as smoothly as my other one.
One further caveat with these models (all of them) is that the detailing is extremely fragile. IE, do please handle them like they were fine china (and don't come crying to me when you manhandle one and wind up breaking off the whistle, bell, handrail stanchions and everything else!) Apparently even Atlas isn't immune to the problem as the above picture of a CPR 4-4-0 (complete with missing whistle) came directly from the Atlas website.
Still and all, let us not end this review on a negative note. Despite the above laundry list of potential problems, I'm sure that the vast majority of these models are fine runners. And I'm equally confident that whatever here-and-there QC issues Atlas might have had with the first production run will be addressed in future runs. But until then, "try before you buy" (if at all possible) would be my advice. And absent that, just be sure to save your receipts so that any bad ones can be sent back to Atlas.
Trivia - Panamint Models (Shapeways) makes a variety of replacement stacks and pilots for the Atlas 4-4-0 -
Prototype info -
The 4-4-0 locomotive was a common sight on North American rails in the 1800s. Approximately 25,000 4-4-0s were produced, before being replaced by larger locomotives in the 1900s. Popularized in American culture and immortalized on movie and TV screens, these locomotives are widely known for their service in the Civil War and in the Old West.
Features -
- Colorful decoration based on paint schemes from the late 1800s and early 1900s
- Smooth-running motor
- Operating headlight
- Separately-applied bell and handrails
- Factory-equipped with AccuMate couplers
- Flared or straight stack as per the prototype
To remove the engine shell, pop the top off the center dome to reveal the chassis screw. Once said screw is removed, slide the shell forward far enough to clear the lightboard and it should lift right off. To remove the top of the tender, first remove the forward and rear wheelsets. This will reveal the four small screws that hold the top in place. Remove them and the top should lift right off.
Grade: A (with the caveats re QC)